The Basics of a User Interface
Last updated on 2024-02-20 | Edit this page
Overview
Questions
- How do we build a User Interface?
Objectives
Learn how to add elements to a UI.
Discover the different layouts and lewks you can create with Shiny.
How do we make things show up in our user interface? The R Shiny ecosystem provides a dynamic layout ecosystem about which much has been written. It’s also constantly being updated and extended by other packages. Here we will begin to add code to our blank app to begin to build something useful to explore data regarding seagrass beds in Casco Bay.
Adding Text to the UI
Starting with our blank app, what happens if we add a little text to
the fluidPage()
R
# 1. Preamble
library(shiny)

# 2. Define a User Interface
ui <- fluidPage(
  "An app about seagrass.",
  "Different Years"
)

# 3. define a server
server <- function(input, output) {}

# 4. Call shinyApp() to run your app
shinyApp(ui = ui, server = server)

FYI, from this point forward, we will just show the parts of the app we are working on, rather than the whole thing.
So, the above is nice. But, 1) It’s just small text and 2) the webpage didn’t have a title. How can we make it look better?
First, note that
R
fluidPage(
  "An app about seagrass.",
  "Different Years"
)
An app about seagrass. Different Years
outputs HTML code again. Within fluidPage() we can
either add HTML code directly with the HTML() function. Or,
if you don’t know/want to learn HTML, Shiny comes with a number of
functions that will generate valid HTML code. You can look these up with
?tags or with names(tags). Note, the later
will show even more possible functions, but for many of them, you have
to use tags$*().
For example:
R
fluidPage(
  h1("An app about seagrass."),
  br(),
  h3("Different Years")
)
An app about seagrass.
Different Years
Generates one big header, a line break, and a smaller header. Let’s add this to our UI and see what it looks like.
R
ui <- fluidPage(
  h1("An app about seagrass"),
  br(),
  h3("Over time")
)
 If we
want our app to have a title, we can give it one as well.
If we
want our app to have a title, we can give it one as well.
R
ui <- fluidPage(
  title = "Seagrass in Casco App",
  h1("An app about seagrass"),
  br(),
  h3("Over time")
)
Note how every piece is separated by a comma.
Explore names(tags) and use different functions to
create a small website you like. You can look at ?tags to
get information about some of them, or just play with
tags$*() to format things in different ways. If a tag can
take other arguments, you can supply them as arguments to the function.
If you have no idea what any of this might mean, check out this html reference.
For example
R
ui <- fluidPage(
  title = "Seagrass in Casco App",
  tags$strong("I am strong"),
  br(),
  tags$blockquote("Here I quoteth from the finest."),
  br(),
  a("Maine Historical Eeelgrass Viewer", href = "https://maine.maps.arcgis.com/apps/MapSeries/index.html?appid=ac2f7b3d29b34268a230a060d6b78b25")
)
Adding a Theme
To see the different pieces of the layout as we move forward, we’re
also going to add a theme. A theme isn’t necessary, but can often make
things shine. The bslib package proves a dynamic tool to
make themes. However, to do so quickly, we recomment shinythemes. Let’s add
the sandstone theme.
R
library(shinythemes)

ui <- fluidPage(
  title = "Seagrass in Casco App",
  theme = shinytheme("sandstone"),

  h1("An app about seagrass"),
  br(),
  h3("Over time")
)
We don’t see it making a huge difference yet, but notice how the font changes. Themes are another great example of an item that one can find many resouces on, but it’s a rabbit hole you can become lost inside of.
Adding Layouts to the UI
Rather than hand-coding all of the HTML in a page, Shiny provides a number of functions that will create dynamic interfaces and blocks of HTML code for you. Check out Posit’s guide to layouts for a fairly comprehensive guide or this chapter from Mastering Shiny. For our purposes, we will use the classic sidebar layout. Let’s start by taking our raw text and making a title panel.
R
ui <- fluidPage(
  title = "Seagrass in Casco App",
  theme = shinytheme("sandstone"),

 titlePanel("Seagrass in Casco Bay over time")
)
To that, we will use a classic sidebarLayout(). Within a
sidebarLayout() we also need to add a
sidebarPanel() and mainPanel, as otherwise the
layout would just be a blank box.
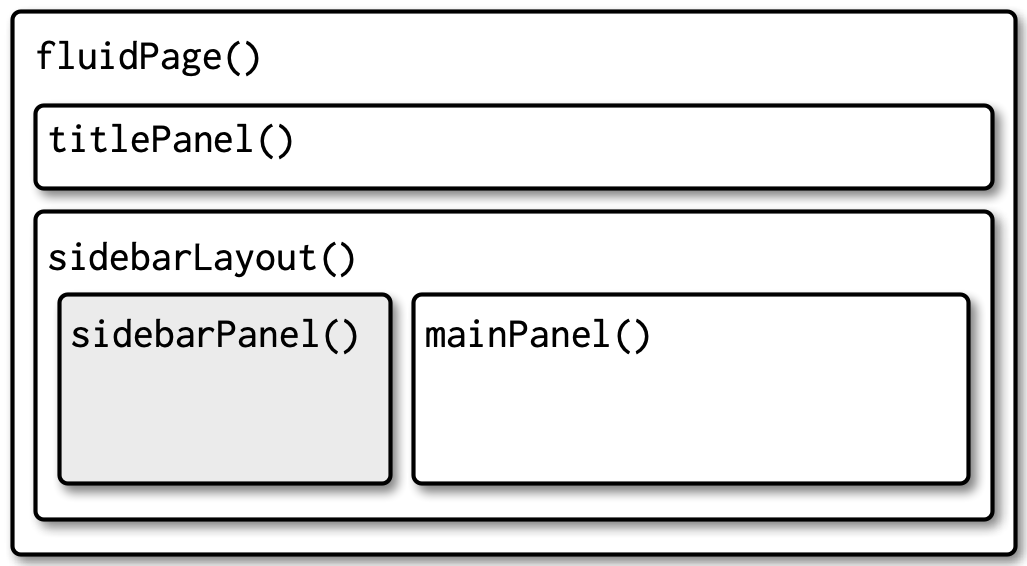 The nesting of a
sidebar layout from [Mastering Shiny](https://mastering-shiny.org/action-layout.html
The nesting of a
sidebar layout from [Mastering Shiny](https://mastering-shiny.org/action-layout.html
R
ui <- fluidPage(
  title = "Seagrass in Casco App",
  theme = shinytheme("sandstone"),

 titlePanel("Seagrass in Casco Bay over time"),

 sidebarLayout(
   sidebarPanel("This is the sidebar"),
   mainPanel("This is the main panel")
 )
)

You might have noticed that there is an inherent column/row layout
here. Fluid pages are structured using fluid rows and columns nested
within fluid rows. There are 12 units of width across a fluid row. Using
fluidRow() and column() make a UI with 3 rows,
3 columns in row 1, 2 in row 2, and 1 in row 3. All dividing the row
equally. Put text into them to see the results.
Note, you might have to stretch your viewing window to see it.
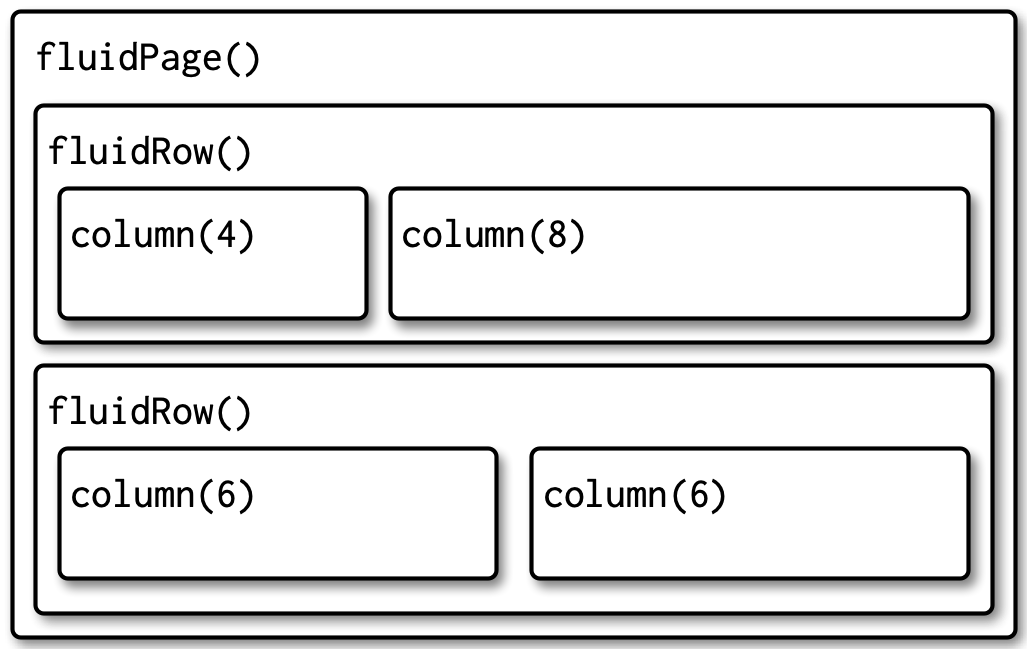 A multirow layout from Mastering
Shiny
A multirow layout from Mastering
Shiny
R
ui <- fluidPage(
  fluidRow(
    column(4,
      "1,1"
    ),
    column(4,
      "1,2"
    ),
    column(4,
      "1,3"
    )
  ),
  fluidRow(
    column(6,
     "2,1"
    ),
    column(6,
      "2,2"
    )
  ),
  fluidRow(
    column(12,
      "3,1"
    )
  )
)